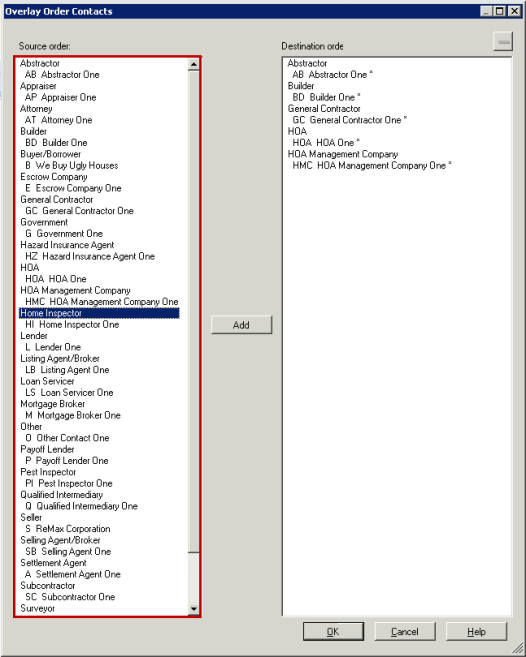
Users can select from a list of order contacts and overlay them into an order. From an open order, press Overlay Order on the ribbon. Select or search for an order to overlay. Select Order Contacts. The Overlay Order Contacts dialog displays two list views:
- Order contacts from the source order
- Order contacts from the destination folder (if any exist)
These list views contain order contact types, codes and names. All Order contacts are available for overlay. In addition to drag and drop ability, the Overlay Order Contacts dialog includes an Add button. To add a contact, select it in the Source order and then click Add. This adds the selection as a new contact on the Destination order. To delete a contact in the Destination order, select it in the Destination order, then either use the keyboard Delete key or right-click and select the remove option.
Select more than one contact by pressing SHIFT+CLICK or CTRL+CLICK. Drag and drop the contacts anywhere in the destination order list view; the contact displays at the bottom of list for the applicable contact type with the appropriate contact code assigned.
Replace an existing order contact in the destination order by dropping an order contact directly onto another contact. If the order contact type matches, a prompt appears to confirm the replacement of the existing contact or insert a new contact. You can only replace an existing contact if there are no “posted transactions” or “sent invoices” associated with the contact.
New contacts display in the destination order list view with an asterisk (*) to indicate they are new. New contacts can only be removed from the destination order's list view.
When overlaying order contacts, the new contacts (along with their data values and associated people) are appended in the destination order. When replacing existing contacts, only the data values associated with the contact are updated, with the codes remaining intact. When replacing order contact people, if the people are referenced anywhere in the application (except as a main contact) they are skipped, leaving them in place and the new contacts are appended. A message indicates that the person could not be deleted and what items are referencing the person. If existing order contact people are not referenced they are deleted. Also excluded from the Order Contacts Overlay is the Represents field associated with Attorneys and Listing/Selling Agent/Brokers.
The Order Contact list views filter contacts based on the related permission - ProForm Order contact (Buyer/Seller) -Add or Edit or Order contact (Non-buyer/seller) - Add or Edit. If all of these permissions are not granted or denied, the Order Contacts checkbox on the Overlay Order dialog is disabled. When adding the contact people during overlay, if Non-buyer/seller - Person - Add or Edit is not granted or denied, a message will appear when the overlay is performed, “Contact people cannot be overlaid because you do not have permission to add people”.
Press OK on the Overlay Order Contacts dialog to return to the Overlay Order dialog with the Order Contacts. If canceled, the Overlay Order - Order Contacts checkbox becomes unchecked and the work will not be saved. Other items may then be overlayed on the Overlay Order dialog. Press OK to complete the overlay.
To create the list of order contacts to overlay into an order:
- Select an individual or contact type in the source order list, drag it to the destination order list and drop it or use the Add button.
- Replace existing contacts in the destination order by dragging and dropping a contact of the same type directly on the contact or select the contact in the destination and press the Add button.
- Select a contact and press Remove to delete new contacts from the destination order.
- Click OK to return to the Overlay Order dialog.
- In the Overlay Order dialog, click OK to complete the overlay.